Thursday, November 5, 2015

11/5/2015: Priorities

At this point in the planning stage (Christmas approaching...), it is important that I shore up my priorities for new/needed gear. As mentioned before, I am searching for the items which give the greatest weight savings per dollar spent. Below is a link to the list (in spreadsheet form, obvi) showing the finalized new gear list. 

SPREADSHEET LINK

Priority is based on cost per ounce saved, ounces saved, pack volume saved, and necessity. By reducing pack volume, I am able to carry a smaller (and lighter) pack, therefore reducing weight. Items that save significant amounts of both weight and volume (like the shelter and sleeping bag) have been placed higher on the list. Items 1 thru 6 on the list are what I've deemed prerequisites; that is, gear that may or may not not save weight but are still necessary for the trip. These include things like a point-and-shoot camera and a sit pad, which add weight but are still something I want to carry.

Items 7 & 8: Immediately following the prerequisites is a new water filtration system, which consists of the filter itself (Sawyer Mini) and a water storage bag (Evernew 2 liter). Together, these 2 items cost only $36 and save 1 lb 3 oz (1.9 $/oz). They replace a heavier pump-style water filter and 1 liter Nalgene bottle.

Item 9: The next piece of gear is a new shelter; the ProTrail from TarpTent. My current shelter is a two-person REI Camp Dome (5 lb 1 oz, incl. tent body, fly, poles, stakes, and lightweight polycro ground sheet). The ProTrail is a lightweight, tarp-style, single-person shelter that relies on hiking poles to pitch. Consisting of little more than a tarp and shallow bathtub-like bug net/floor, its total weight (incl. tent, stakes, and polycro ground sheet) is only 1 lb 11 oz (3 lb 2 oz saved, 4.2 $/oz).

Item 10: At 6.0 $/oz, an Enlightened Equipment Enigma top quilt in place of my mummy sleeping bag saves almost 5 liters of pack space along with 2 lb 4 oz.

Item 11: A pair of Ultralight Rain Pants from AntiGravity Gear would replace my zipoff style hiking pants and save 10 oz at 5.5 $/oz.

Item 12: Next is a new cookpot. Moving from a nonstick-coated pot to an un-coated titanium one is made possible by the fact that I won't be doing any cooking of food directly in the pot; I'll only be boiling water for dehydrated meals (food tends to stick to titanium pots). In addition, the most water I'll need to boil at a time is 2 cups (16 fl oz, 475 mL). At 1.8 L (61 fl oz), my current pot is oversized. Switching to a SnowPeak Trek 700 will save 5.3 oz for only 7.3 $/oz.

Item 13: While the weights of some categories like toiletries and food can be minimized cheaply by simple research and diligence (and spreadsheets), the insulating clothing layer tends to be one where the only weigh way to save weight is to spend money. Even still, a new (goose) down jacket from MontBell (5.6 oz) would replace my (synthetic) down hooded jacket from Columbia (22.5 oz) at a cost of just 9.6 $/oz. In addition to being more lightweight than synthetic down, goose down is more compressible. This allows me to reduce my pack volume and weight even further.

Item 14: Hanging one's food isn't a legal requirement on the Oregon section of the PCT, but sometimes it will be necessary. For example, mice and ants are fairly common on the trail. The former have been known to chew their way through tents and food bags in search of tasty treats. Because of this, a simple method (meaning not necessarily bear proof like in the Sierra Nevadas) of hanging food is desired. The PCT hang is both simple and quick, requiring minimal gear. ZPacks sells a Bear Bag Kit, which consists of a durable (but lightweight) food bag (1.4 oz), 50' of lightweight cordage (1.4 oz), a rock sack (0.1 oz), and a small carabiner (0.1 oz). These 4 items would save 4.4 oz at 10.3 $/oz.

Item 15: The main way to save weight on my sleeping pad is to switch to a closed cell foam (CCF) pad, as opposed to an inflatable mattress. The downside to CCF pads is that they are (for me) terribly uncomfortable. The other way to save weight is to shrink the size of the pad. By switching to a pad that only extends from my head to upper thighs, I can shed about 1/3 of the weight and still maintain a comfortable sleep system. My empty backpack would typically serve as the remaining terminus of the mattress, resting under my feet and lower legs to provide insulation and comfort. A Thermarest NeoAir XLite (short length, 8.0 oz) would replace my REI Flash (regular length, 16.5 oz) at 15.3 $/oz.

All items listed are also on my PCT Pinterest board.

Monday, November 2, 2015

10/12/2015: Stoves

Now that I've decided on bringing a stove (as opposed to going stoveless), the only decision left is which stove system to use. Only 2 options remain at this point: A denatured alcohol Fancy Feast stove and canister fuel with a screw-on stove.

A Fancy Feast stove is a simple, lightweight, and inexpensive option for lightweight backpacking. It is an empty cat food can with holes punched around the top of the can. One simply fills the stove with denatured alcohol (Heet gasoline additive is usually easy to find) and lights it on fire. Once the cook pot is on top, the flames are forced out of the holes creating fairly efficient flames. Normally, this type of system is the lightest for shorter trips. The stove weighs just 6 g and the amount of fuel brought on the trip is adjustable (as opposed to a canister fuel container). In addition, there is flexibility in the alcohol fuel container. Typically, a small 8 fl oz flask (0.95 oz) is just the right amount for a weekend trip. The downsides to this system are its controllability and weight (ironically). Once the stove is lit, the flame is nearly invisible (especially in bright conditions) and will persist until the fuel is spent. In a dry environment where a human-caused forest fire is a real danger, this type of stove is an irresponsible choice since there is no way to shut off the flame. In addition, while this system tends to be lighter for short trips, the relatively low energy density of the fuel becomes the limiting factor for extended trips. Larger (heavier) fuel containers must be carried, and the weight of the fuel begins to offset the savings presented by the stove itself. Below are the stats for this system.

Stove Wt: 0.78 oz (incl stove and windscreen)
Fuel Container Wt: 1.1 oz (16 fl oz Smart water bottle)
Fuel Container Capacity: 16 fl oz
Fuel per Meal: 1.8 fl oz

A "jet stove" and pressurized fuel canister is likely the most common backpacking cooking system. It is safer and easier to use than an alcohol stove system, and is generally lightweight. Because the fuel and fuel container are relatively heavy, it is often overshadowed by an alcohol-based cooking system for shorter weekend trips. However, once the trip length creeps upwards of 5 days, the energy density of the pressurized fuel begins to offset the weight of its container and it becomes the lighter choice. The other benefit of a jet stove system is the ability to positively shut off the flame and fuel source. Below are the stats for this system.

Stove Wt: 3.5 oz (incl. stove and bag)
Fuel Container Wt: 4.2 oz (110g pressurized canister)
Fuel Container Capacity: 3.9 oz
Fuel per Meal: 0.32 oz

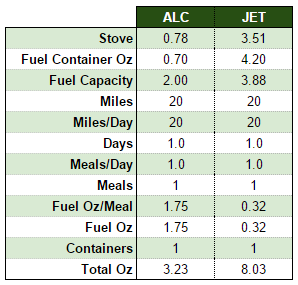
The static factors when comparing weights of cooking systems are the stove (plus accessories like carrying bag, windscreen, etc.) and the fuel container (not the fuel itself). One can think of these as "overhead." They must be carried regardless of the trip length. The dynamic factor is the amount of fuel carried, which depends on the trip length. The alcohol-based system has the benefit of flexibility in the amount of fuel carried. On a one night trip, you may only use 15% of the fuel in a jet stove container. However, you still must carry the entire 4.2 oz of the canister because the fuel is pressurized and cannot be repacked into smaller containers. On the same trip, using an alcohol stove, I would only need to carry 1.8 fl oz of fuel, meaning I could downsize my fuel container to something that only weighs 0.7 oz. The comparison table for this trip is below.


As you can see, the fuel container for the alcohol system is able to be scaled down to fit the length of the trip. In contrast, the jet system requires you to carry the excess capacity. In this case, the alcohol system weighs less than half of the jet system.

Also evident in the table are the various other factors which influence the overall weight of the cooking system. Starting from the top, The static weights (stove and fuel container) are listed. Following that, the total and daily mileage of the trip is listed. From this, the total trip length (in days) is calculated. The next input is meals/day. This is anywhere from 0.5 (cooked dinner every other night) to 3.0 (cooked breakfast, lunch, and dinner every day). Total number of meals for the trip is then acquired. The final input is the amount of fuel required per meal. From this, we can calculate the total amount of fuel and therefore the number/size of fuel container(s) needed. The total weight is then simply STOVE + FUEL CONTAINER(S) + FUEL. 


In the next example, the longest resupply stint I will face on the trail (105 miles) is modeled. On the alcohol side, you will notice the changes include: alcohol fuel container weight (changed from small 2 oz bottle to a 16 oz water bottle), miles, and meals/day (assumed cooked breakfasts every other day). This table paints clear picture of the downsides of an alcohol-based system. The fuel simply contains much less energy per oz than the pressurized canister.

From this data, we can plot a chart of the overall cook system weight (vertical axis) as a function of trip duration (horizontal axis). This applies the same parameters (miles/day, meals per day, etc.) to both the jet and alcohol systems while varying the trip length. The point at which the 2 lines cross is the trip distance where the 2 systems would weigh the same. Any shorter and the alcohol system is lighter. Any further and the jet system is lighter. Also of note are the steep jumps that occur at mile 120 for the alcohol system and mile 160 for the jet system. These are the points at which an extra (or larger) fuel container would need to be carried.


Monday, October 12, 2015

10/11/15: Hiking

Topographic map (follow trail North to South)

Route: Trail 626 from Vista Ridge trailhead, 2.5 miles to user trail continuing up the ridge. South another 1.5 miles to the top of Barrett Spur. Descent via same path.
Stats: 8.1 miles (3,600' gain)
Notes: Trail 626 links up with the old Vista Ridge trail after 0.3 miles. After filling out our wilderness pass at the kiosk, we continued uphill at a fast pace, gaining 1,300' and 2.5 miles in just under an hour. After a quick peanut butter snack, we left the trail and started up the direct, steep slope to the base of Barrett Spur. Gaining 1,500' in only 1 mile, we finally started up the steep user trail on the north ridge of the spur proper. We quickly discovered the slick, transparent sheets of ice on the north side of most rocks, and proceeded with caution until gaining the summit of the first and lower of Barrett Spur's 2 peaks. Looking south, the view of Mt. Hood's daunting north face was incredible, glaciers and steep faces making us feel small. Looking across the ridge to the true summit of the spur, I continued until the start of the final climb, where the ice and exposed nature convinced me to halt. Ryan proceeded on to the summit (you can see him at the top), then returned for a lunch break of epic proportions. Our perch felt like the top row of a movie theater, with Mounts St. Helens, Ranier, and Adams the stars. The clouds beneath us began to thicken and race towards us, so we began the steep trek back down to the car. 

Friday, October 2, 2015

9/14/15: Hiking

Mt. Hood from Zigzag Canyon

Route: Trail 778 from Paradise Park trailhead, 5.3 miles to PCT. East 2.5 miles to trail 779. South 4.4 miles to Rd. 39, 0.9 miles back to car.
Stats: 13.8 miles (4,281' gain)
Notes: Trail 778 (Paradise Park) climbs the west side of Zigzag Canyon. The trail is sustained and quite steep at times, offering 2 main viewpoints: one partway up the canyon atop the steep western walls, the other among beach-like sand below the towering peak. At the junction with the PCT, we turned right and admired the vast chasm that is Zigzag canyon, Mt. Jefferson looming in the distance. After an accidental detour and a lunch of salami, cheese, and snickers, a gradual descent to the crotch of the canyon led us to a wmildly flowing Zigzag river. The trail then kicked back and provided a tough mental and physical challenge from mile 6.5-8.0, climbing 1,400'. The best view was atop a steep saddle on the east ridge of Zigzag canyon, providing us with a clear view of Illumination rock below the summit of Mt. Hood. The lack of snow near the summit gave us the sense that we could simply hike to the top, while the harsh, dust-laden wind urged us to keep moving. Once at the junction with Trail 779 (Hidden Lake), we turned right towards the car and descended sharply for 2 miles past Hidden Lake. The trail then levels to a fast 2 miles back to the road. Just under a mile on the road (tarmac hiking is actually really terrible after miles on the dirt) brought us back to the car, and a high-five celebrated our accomplishment.

Monday, September 28, 2015

9/4/2015: Itinerary

Spreadsheet magic

While it will be impossible to plan out each day of a 430-mile hike, an overall schedule is necessary to plan out resupplies and food quantities. The main topics to be worked out are starting date, resupply quantities/locations, and total time on trail.

Picking a starting date is somewhat of a balancing act. Weather, trail conditions, bug activity, and work schedules all play a part. The window for weather and trail conditions is between mid June and early September. Any earlier than June and one risks running into too much snow. Any later than September and drying creeks combined with hot temperatures make for a difficult trip. I'm still researching when bug activity is at a minimum, but it seems like it's too hard to predict. In addition, I've yet to read a PCT journal that didn't mention how terrible the bugs were through Oregon. It may just be a fact of the trail and time of year, so all I can do is prepare with the proper gear and mental outlook. Since I want to meet Kylie along the way and will be relying on her for to and from the trail, the duration of the hike must fall within her summer break, which starts in mid June and ends in early September.

Alternatively, one could reference the schedules of the hundreds of thru-hikers starting at either border (Mexico or Canada) to see when they'll be in Oregon. The standard start date for the 5-month trip is early April for Northbounders and late June for Southbounders. This places the Oregon window between July 15 and August 6 for both groups (assumes overall 20 mile/day pace). However, when planning to hike the entire trail, Oregon is hardly the driving factor for selecting a start date. For Northbounders, the crucial times are the heat in the southern California desert, residual snow in the Sierras, and new snow in the Washington Cascades. For Southbounders, the critical window is avoiding residual snow in the Cascades and getting to the Sierras before new snow. In both cases, Oregon not the priority but rather an afterthought sandwiched between more serious challenges.

The duration of the hike is based on average miles hiked each day, number of zero-mile days, and time spent at resupply locations. My duration assumes a 20 mile/day average, which is based on research and what I think I am capable of. After interrogating Ryan and reading others' online journals, I've learned that once your body gets used to hiking every day, the miles tend to come easier. In addition, it's not hard to spend 12-16 hours each day hiking, especially when solo. After eating dinner at 6:00 PM, for example, you have the option of setting up camp and relaxing for 3 hours waiting for the sun to set, or you can keep hiking and gain another 6 miles (assuming your feet abide). In short, there's not much else to do but hike! I don't plan on taking any zero-days, save for any potential meet-ups with friends along the trail. As a buffer/safety factor, I've assumed that once I make it to each of my resupply locations, I'll spend the rest of the day there, continuing on the next morning. This accomplishes a few things: It allows me time to collect my resupply package, purchase anything I may need, charge my devices (phone, battery pack, camera), eat "real food" at any facilities there may be, and shower/launder, if available. As calculated by one of my many spreadsheets (photo above), this works out to a total duration of 25 days.

All things considered, I am thinking that a start date coinciding with the full PCT dates (July 14 - Aug 7) is best. In addition to satisfying the criteria outlined above, it conveniently accomplishes a few additional things. It occurs in the window between Kylie and my wedding anniversary (July 2) and Kylie's birthday (August 13). In addition, hiking during the standard Oregon window means there will be the highest volume of thru hikers and therefore the most potential for receiving support. Since I'm hiking solo, the chances of getting help on trail will be the greatest during this time. 

Wednesday, September 23, 2015

9/1/15: Calories

Mmmm, peanut butter

The main priorities for me when it comes to food are perishability, calories/oz (weight), and ease of prep/cleanup. By and large, there are 2 main options I'm considering: boiling water for dehydrated meals or eating all cold meals. There are certainly benefits to both options, but my (limited) experience is steering me towards the former.

By going stoveless and eating only cold meals, I could save almost 1 lb by eliminating my stove (3.5 oz), cookpot w/ lid (3.0 oz), pot cozy (0.6 oz), and fuel (8.0 oz, in canister). Also saved is the time and headache of setup and teardown of the stove every night (and perhaps some mornings). The obvious downside is cold meals. I've done some research into no-cook hiking and, to be honest, it sounds terrible. Breakfast and lunch options would be mostly the same as if I had a stove, since I don't plan on heating water for most of those meals. Dinner, however, is where the stove system makes up for its added weight. Many no-cook dinners would consist mostly of the trail foods I'd been eating all day: granola bars, trail mix, peanut butter, dried fruit, candy, etc. While there are some dried foods that can be rehydrated with cold water (quinoa, cous cous, chia seeds, insta-potatoes), they tend to require a lot of other ingredients to make them palatable, some of which don't have a shelf life of 30+ days. Since I'll be sending resupply packages ahead of time (as opposed to buying in towns along the way), everything in them must last at least 30 days.


I believe that for trips up to a week long, going stoveless is a viable option. For my situation (25+ days of hiking with resupplies sent ahead of time), bringing a stove will serve me much better. Not only are the dinner possibilities much more delicious and calorie-filled, the stove will give me the flexibility to have hot breakfasts when I need them.


In keeping with the theme of carrying as little weight as possible, finding foods with a high caloric density is essential. An average of over 100 calories/oz is ideal. Foods that tend to be high in fats are very good in this sense: peanut butter, olive oil, nuts, and candy. Foods that are mostly protein or carbs are generally heavier: tuna, jerky, bread, and cheese. Of course, calories aren't the only thing to be concerned with. While it is necessary to eat over 3,000 calories/day, providing your body with a decent mix of fat, protein, and carbs is also important. Again, there exists a balance. This one between carrying the lightest 3,000 calories/day and the healthiest 3,000 calories/day.


Keeping a constant variety of foods will also be crucial. After my 2013 hike of Mt. Whitney, I learned that all the calories in the world mean nothing if you don't want to eat them. Although the elevation played a large part in ruining our appetites, we all learned the hard way that if it doesn't taste that good to begin with, it will certainly not taste good after eating 10 of them (I'm talking about Clif bars). This is part of the challenge in sending resupplies in advance: I'll need to decide on and send my 25 days of food up front.


I was surprised with the breadth of foods that can be packed in without spoiling. Aside from the obvious items (nuts, jerky, granola bars, etc.), cheese blocks, dry salami, mayo packets, summer sausages, and dehydrated ground beef offer the ability to vary meals in an exciting way.

Breakfast

Breakfasts will either be hot or cold, depending on how I'm feeling that particular morning. A 110g canister of fuel will contain enough fuel for heating water every morning and night for a week, so I have some flexibility. One of the things I'll need to work out during training trips is if/how often I feel like cooking for breakfast. While hot oatmeal and tea every morning sounds nice now, taking the time to boil water before hiking may not be something I want to do every day. I suspect that I will end up mixing both strategies.

For hot breakfasts, oatmeal will be the go-to. For ease of packing and cleanup, I will likely pre-package 2 packets of insta-oatmeal into individual sandwich bags. Dried fruits (cranberries, blueberries, etc.) are easily added on the trail and provide some variety. Since I suspect I'll only be having hot breakfasts once every few days, I'm not too worried about getting sick of the oatmeal.


For cold breakfasts, it's all about danishes and granola bars. I am also looking forward to testing out granola mixed with powdered milk. I'm hoping it turns out like the Trader Joe's cereal...


Lunch/Snacks

So far, my backpacking snacks have normally consisted of pretty typical trail food: peanut butter (it's the best), trail mix, bars, almonds, candy, and jerky. Lunches are slightly more interesting, but still not cooked. Current items I like include dry salami, tuna sandwiches (foil tuna pouch, mayo packet, bread) and tortilla rolls (ingredients ranging from peanut butter and nutella to salami and cheese).

Some things I'm looking forward to trying between now and next summer are ProBars (supposedly good tasting and very filling), PB&J on flatbread, dehydrated fruits, and more tortilla wraps (want to experiment with PB, jerky, hot sauce, fritos, etc.). I also read about someone who brought Emergen-C for electrolyte and vitamin intake...something to think about. I could also use Gatorade powders in my water at lunch and/or dinner, which provide a welcome break from the monotony of 5 L/day of water.

Dinner

Dehydrated meals cooked in freezer bags are the name of the game here. Not only do they give me a hot meal full of good calories, they are (relatively) lightweight and (extremely) easy to clean up. Some things I've liked in the past are Mountain House entrees (made in Albany, OR!), Knorr sides (pasta, rice, and asian), insta-potatoes, and mac and cheese.

While Mountain House entrees are the easiest and (generally) have the best flavor and texture, they are very expensive (between $5-8 per meal). Knorr Pasta sides have good flavor but a funny texture (they are designed to be boiled in a pot for 5-10 minutes, not just rehydrated by sitting in hot water). I've read great things about the Knorr Rice and Asian sides (yet to try). Idahoan insta-potatoes are supposed to be a favorite of thru-hikers. I've seen some "interesting" recipes that involve combining a pack of insta-potatoes and a pack Ramen noodles (nicknamed the Ramen Bomb for the dense orb of calories it assumes). Classic mac and cheese rehydrates pretty well after 15 minutes of sitting in a pot cozy. The noodles take on a different texture than when boiled for 10 minutes, but the radioactive cheese mix is the star. The other selling point is that 1 box provides 780 calories for under $1 and 7.6 oz. A squirt of olive oil bumps the calories over 1,000 and results in a caloric density of 117 cal/oz.

All of these get repackaged into freezer bags with any included flavor/spice packets already mixed in. On the trail, I simply set the freezer bag in my pot cozy, pour in hot water, close the bag, then wait 10-15 minutes for the food to rehydrate. The pot cozy (made from reflectix bubble insulation) keeps the concoction hot while it cooks. After eating, I simply close the freezer bag and put it in my trash bag. A quick lick of the spoon and dishes are done! Since I'm only using my cookpot for boiling water, it never needs to be cleaned.

There are a number of dinner options I'm looking forward to trying. Some are simple additions like adding summer sausages to mac and cheese, tuna to Knorr pasta sides, and having miso soup packets as an appetizer to Knorr asian sides. New ideas include meals I've never tried backpacking-style. Tacos can be had with a dehydrated taco filling mix, tortillas, and cheese. Bean and cheese burritos are similar except with a black bean mix, to which ready-rice can also be added. Sloppy joe mix on flat bread sounds appealing, as does a simple meal of pasta, freeze dried ground beef, and olive oil.

Monday, September 14, 2015

08/27/15: Partner

I talked with Kylie about general info and logistics last night, and it helped me to verbalize feelings I was having about the hike. Until tonight, it was mainly just me and my spreadsheets. Her main questions were


  1. Why solo?
  2. How is cell service?
  3. Can we meet up for sections of hiking?


For me, the issue of thru-hiking solo is mostly a matter of practicality. It is virtually impossible for 2 hikers to be on the same schedule. One may need a rest day to recover from blisters while the other is ready for a long day. One may want to stop for dinner at 6:00 and continue hiking into the night while the other doesn't want to eat until 8:00 and be done for the day. In addition to the practical reasons, I believe I would get more from the hike (spiritually and emotionally) by myself. The thought of being completely free to decide where, when, and how I hike, camp, eat is appealing to me. Obviously, there are safety concerns, but between my research, planning, and loved ones willing to help, I know we can make it safe.


It appears as though cell service is quite good along the trail. At a minimum, I'm expecting to be able to make calls and emails at all 4 resupplies. Here are the grades given to the 4 resupplies according to PCTA’s cell service report: Mazama Village (A), Shelter Cove Resort (A/B), BLYC (B), Timberline Lodge (B), Cascade Locks (A). Service is actually pretty decent along the trail, with a grade of at least B coming every 50 miles or so. The other good thing about the PCT is that it will be relatively busy at that time of year. I'll likely be starting my hike within the window of full-trail PCT hikers arriving in Oregon (late June to late July), so I'll be getting passed by a number of hikers daily.


I do hope I can meet up with Kylie and Geoff for short sections of the hike, perhaps for a weekend or 2. I think I would enjoy the change of pace and company. The main hurdle is logistics. They would need to shuttle 2 cars or take public transit on the way down and/or back. I looked into good spots for making this happen and have yet to come up with any good ideas.